Neapolitan Pizza at Home: The Complete Technique Guide

Making proper Neapolitan pizza at home comes down to four locked variables: a 60-65% hydration dough cold-fermented 48-72 hours, a stone hitting 430-480°C, a 60-90 second bake, and a hand-stretch that never touches a rolling pin. Get those right and the rest is detail. Get the stone temperature wrong and nothing else can save the bake.
I have been splitting the same dough batch across three oven classes the same evening for years — gas, dual-fuel dome, and an indoor electric — precisely because dough is the variable I genuinely control and the oven is the instrument under test. This guide is the distilled version of that dough log: the Neapolitan protocol as a repeatable sequence, not romance. Every number here is either measurable on my own bench with an IR gun and a 0.1g scale, or I have left it out.
What Makes a Pizza Neapolitan?
Neapolitan pizza is defined by a soft, leoparded cornicione, a thin pliable center, and a bake so fast the dough puffs before it can dry out. The AVPN (Associazione Verace Pizza Napoletana) rulebook codifies it: 00 flour, no oil in the dough, a roughly 250mm round, and a bake around 60-90 seconds at deck temperatures near 430-485°C.
You do not need to chase certification at home to chase the result. What matters is understanding why each rule exists. The high heat is what creates oven spring fast enough to leopard before the crumb sets. The lack of oil and sugar in a true Neapolitan dough is why it can take that heat without the sugars scorching black in three seconds. Pizzaioli in Naples argue endlessly about wood versus gas and AVPN orthodoxy — I present the rulebook rather than preach it, because at 90-second bakes the dough and the stone temperature decide far more than the fuel does.
The honest framing: Neapolitan is a heat-and-dough discipline first, an ingredient list second. A perfect dough launched onto a cold stone fails. A mediocre dough launched onto a screaming stone at least chars correctly. The whole craft is making both right at once.
The Neapolitan Dough Protocol (Hydration and Flour)
A reliable home Neapolitan dough sits at 60-65% hydration with strong 00 flour, around 2.5-3% salt, and a tiny dose of yeast — under 0.3% fresh, less if you ferment longer. That is the standing formula in my dough log, and it is forgiving enough to launch by hand without tearing.
Hydration is the lever most home bakers pull too far. People hear “high hydration is better” and push toward 70%, then can’t stretch the dough without it sticking to the peel and tearing on launch. For Neapolitan specifically, 62% is my default: enough water for an open crumb, dry enough that the skin handles cleanly. If you want the deeper mechanics of why water percentage changes everything, my pizza dough hydration breakdown walks through it with the full math.
Flour choice matters because of W-strength — the protein’s ability to hold gas through a long ferment. A weak supermarket flour fermented 72 hours will collapse into a slack, gummy mess. Strong 00 (or a strong bread flour if 00 isn’t available) holds its structure across the cold ferment. I run a 00-against-strong-bread-flour comparison constantly, and for the soft Neapolitan chew, 00 wins on texture every time. The full dough sequence — mixing, bulk, balling — lives in my complete pizza dough guide, which this Neapolitan protocol builds directly on top of.
How Long Should Neapolitan Dough Ferment?
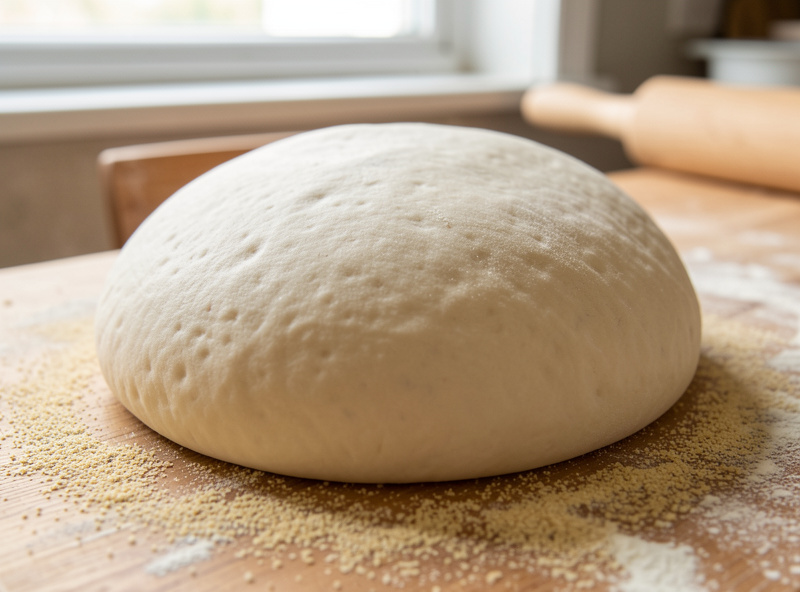
Neapolitan dough develops its best flavor and digestibility with a 48-72 hour cold ferment in the fridge. A 24-hour dough works, but the long cold rest is where the wheat flavor deepens and the crumb gets that slightly tangy, open character that separates a good pie from a great one.
My standing default is a 48-hour cold ferment: mix, a short bulk at room temperature, ball, then straight into the fridge in sealed trays. The cold slows yeast activity so the dough matures on flavor without over-proofing on gas. At 72 hours you get more complexity but a narrower launch window — push past that with too much yeast and the balls slacken and tear. The cold-ferment mechanics carry straight over from my 48-hour cold ferment method, which I treat as the parent process for every Neapolitan bake.
The thing nobody tells you: take the balls out 2-3 hours before baking. A dough ball straight from a 4°C fridge is tight and snaps back when you stretch it. Letting it come up to room temperature relaxes the gluten so it opens willingly. I have ruined more pizzas by rushing cold dough onto the peel than by almost any other mistake. For the full schedule by ambient temperature, the dedicated Neapolitan fermentation time guide maps it out.
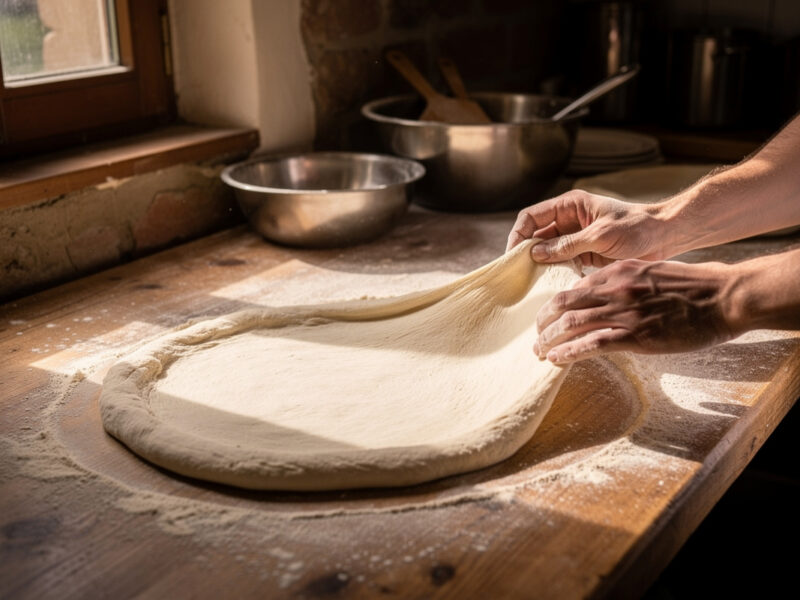
The Hand-Stretch: No Rolling Pin, Ever
Neapolitan dough is stretched entirely by hand to preserve the gas in the rim. A rolling pin crushes those bubbles flat and gives you a cracker, not a cornicione. The technique is a sequence: press the center, leave a 1.5-2cm rim untouched, then stretch the disc outward over your knuckles, letting gravity do the thinning.
The move that took me longest to learn: pressing the gas from the center toward the rim before stretching, so the cornicione inflates and the center stays thin. Start by dimpling the dough with your fingertips, working from the middle out but stopping short of the edge. Then lift, drape it over the backs of both hands, and let it fall and rotate, the weight pulling it thinner. Keep the bench floured with semolina so nothing sticks.
The failure mode is a thick, doughy center because you were afraid to stretch it. A proper Neapolitan base is almost translucent in the middle — you should nearly see your hand through it. If it tears, you have a too-cold ball or you stretched a weak patch; ball it gently and let it rest. The complete sequence, including the slap-stretch and how to recover a torn skin, is in my hand-stretch guide.
Stone Temperature: The Launch-Decision Number
The single most important measurement in Neapolitan baking is the stone surface temperature, and it should read 430-480°C before you launch. I check mine with an IR thermometer gun pointed at the center of the stone — that number, not the oven’s air gauge, decides whether the pizza is ready to go.
Air temperature and stone temperature are not the same thing. An oven can show 450°C on its dial while the stone is still only 380°C because it hasn’t heat-soaked. Launching onto an under-temp stone gives you a pale, leathery base with no leoparding — the dough cooks slowly and dries instead of springing. The fix is patience: let the stone soak after the air comes up to temperature.
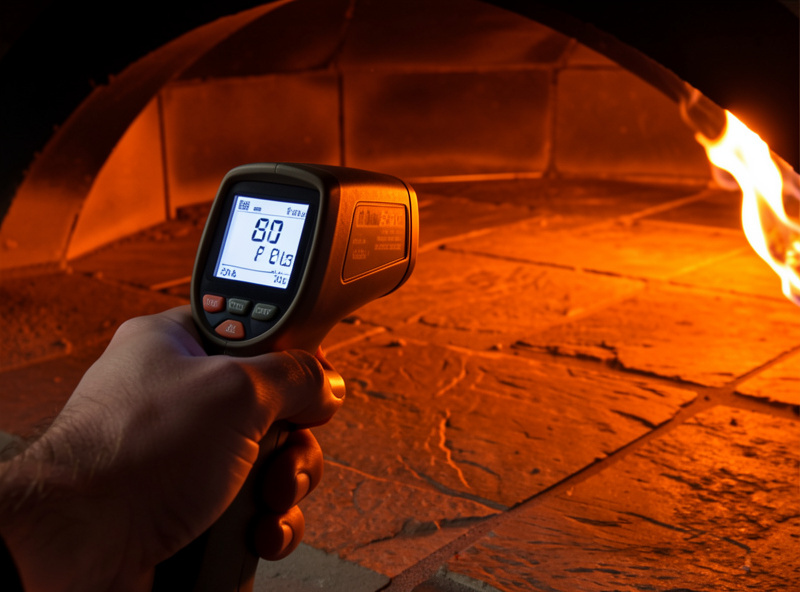
Recovery time matters as much as peak temperature when you bake several pies. Each pizza pulls heat out of the stone; if you launch the next one before the surface recovers, the base under-bakes. I let the stone climb back toward target between bakes — the IR gun tells me when. The full temperature discipline, including recovery between pies and heat soak, is covered in the dedicated oven temperature guide.
The Launch and Turn
The launch is a single committed forward-then-back motion that slides the dressed pizza off the peel without dragging. Hesitate and the dough grabs the peel; commit and it lands clean. Then the pizza needs turning roughly every 20-30 seconds because the side facing the flame chars far faster than the back.
A perforated aluminum launch peel changed my launch success rate more than any oven upgrade. Flour and semolina fall through the holes instead of building into a sticky paste that glues the pizza down. Before that, half my launches stuck. Dress the pizza fast — the longer wet sauce sits on the skin, the more it bonds to the peel — and give the peel a small jiggle to confirm the pizza is loose before you commit.
Turning is where a separate turning peel earns its place: a small round metal peel you slide under one edge to spin the pizza in place. In a 90-second bake there is no time to pull the whole pizza out, rotate it, and reload. The deeper launch-and-turn cadence, including how to read when the back needs the flame, is in my Neapolitan launch technique guide.
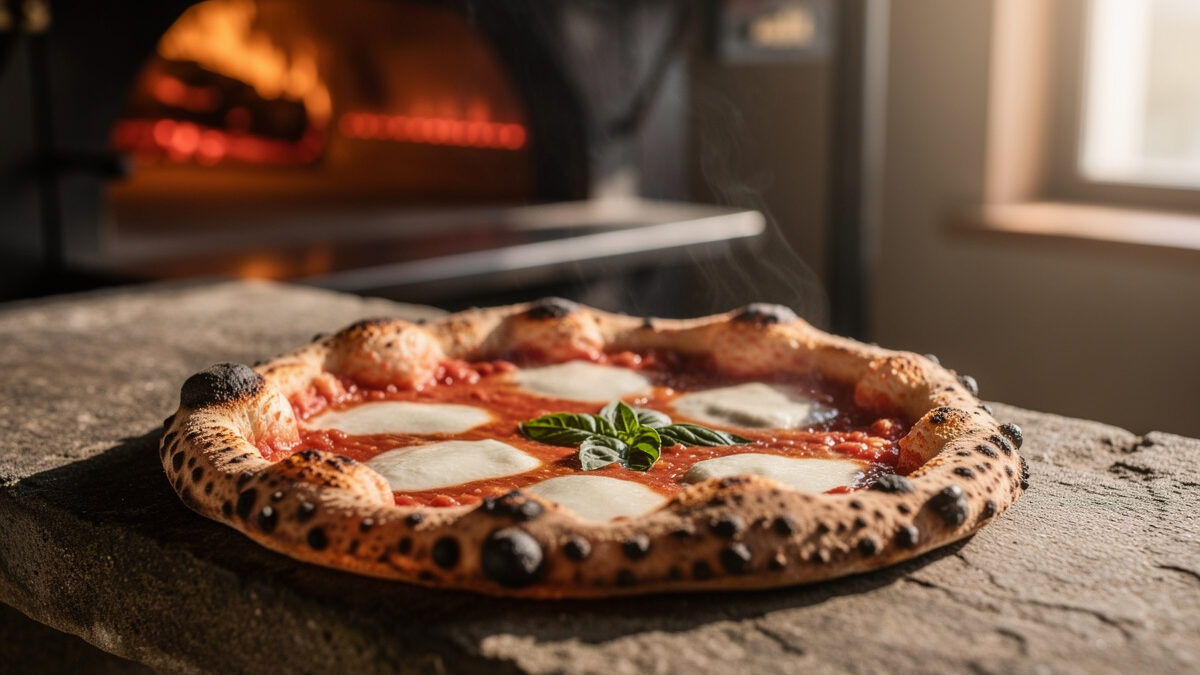
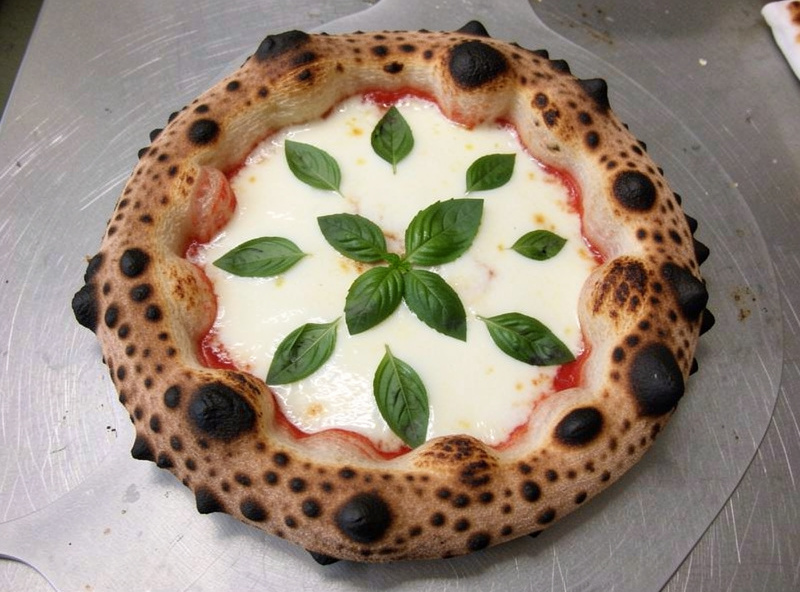
Leoparding: Reading the Char
Leoparding is the pattern of dark, blistered spots on the cornicione, and it is the visual proof your bake hit the right heat in the right time. Those spots are caramelized, slightly charred bubbles — the result of fast oven spring at high heat. Even brown all over means too slow and too cool; pure black means too long or too hot.
The distinction that matters: char versus burn. Good leoparding tastes faintly bittersweet and adds depth. Burnt means acrid, ashy, and bitter all the way through. The line between them is seconds and degrees. Light, sparse spots mean the stone was a touch cool or the bake too fast; dense, merging black means it cooked too long. Diagnosing your own leopard pattern tells you exactly what to change — the full diagnostic chart is in my leoparding guide.
Which Oven for Neapolitan at Home?
Neapolitan bakes need a stone that can hold 430°C+, which rules out most standard home ovens topping out at 250-300°C. Your realistic options are a portable gas oven, a dual-fuel dome, an indoor high-temp electric, or — as an honest entry point — a pizza steel under a maxed broiler that gives you something close, slower.
I judge every oven against the same dough batch, and the table below reflects how each class actually performs on a true Neapolitan bake, not the marketing. The fuel debates matter less than people think at these times: wood adds romance and a little ambient heat character, but at a 90-second bake the flavor difference is far smaller than the dough and stone temperature. Pick the oven that fits your space and climate — my full pizza oven buying guide walks the decision, and the gas vs wood comparison settles the fuel question.
| Oven class | Max stone temp | Neapolitan bake? | Best for | Trade-off |
|---|---|---|---|---|
| Portable gas (Ooni-class) | ~450-480°C | Yes, true 60-90s | Outdoor, fast heat-up | Left-wall hot spot, needs turning |
| Dual-fuel dome (Gozney-class) | ~450-500°C | Yes, true 60-90s | Gas-vs-wood flexibility | Bulkier, more fuel cost |
| Indoor electric (Effeuno-class) | ~450°C | Yes, year-round | Cold climates, consistency | Smaller deck, higher upfront cost |
| Home oven + pizza steel | ~250-300°C | Approximation only | Before you buy anything | 3-5 min bake, no true leoparding |
The indoor electric is my Swedish-winter weapon — when it’s -5°C outside, a gas oven fights the ambient cold and recovery time stretches out. An indoor electric oven with a biscotto stone holds temperature regardless of the weather. If you’re not ready to buy a dedicated oven, the broiler method on a pizza steel is the honest before-you-spend test of whether you even like making this.
Dressing a Neapolitan Pizza: Less Is More
A Neapolitan pizza takes a thin layer of crushed San Marzano-style tomato, torn fresh mozzarella, a few basil leaves, and a thread of olive oil — and that restraint is structural, not stylistic. Pile on toppings and the 90-second bake can’t cook them through, leaving you a soggy raw center under a charred rim.
The two enemies of a fast bake are water and weight. Fresh mozzarella holds a lot of moisture; if you drop wet slices straight on, they flood the center and the base never crisps. I tear the mozzarella and let it drain on a cloth for 20-30 minutes first — that one habit fixed more soggy-center pies for me than any oven adjustment. Same with the sauce: a thin smear, not a ladleful, and a no-cook crushed tomato so the only cooking it gets is the 90 seconds on the stone. The sauce sitting wet on the skin is also what glues a pizza to the peel, so dress fast and launch faster.
Basil goes on before the bake in Naples but scorches in a fierce home oven, so I often tuck it under the cheese or add it the second the pizza comes out. The thread of oil goes on after the bake, not before — raw oil drizzled on at launch can smoke and turn acrid at these temperatures. None of this is fussy once it’s habit; it’s just respecting that at 460°C the bake punishes anything heavy or wet.
Nordic Reality: Baking Neapolitan in the Cold
Baking outdoors at -5°C is where an oven’s real heat retention gets audited, because the ambient cold pulls heat out of the stone between every bake. A portable gas oven that recovers in 90 seconds in summer can need three or four minutes in deep cold — and that recovery gap is what wrecks the second and third pizzas of the night.
This is the honest case for an indoor electric in a cold climate, and why mine is the year-round reference every outdoor bake gets judged against. Outdoors in winter, I heat-soak longer than feels necessary, bake the first pizza, then wait noticeably longer for the stone to climb back to target before the next — the IR gun, not impatience, calls the shot. Propane also behaves differently in the cold: the tank pressure drops as the liquid struggles to vaporize, so the flame can weaken on a hard winter night. Keeping the tank from sitting on frozen ground helps more than you’d expect.
Wind is the other Nordic variable nobody warns you about. A gusty evening strips heat off an open-mouthed oven and skews the bake toward the sheltered side. I orient the oven mouth away from the wind and accept that on a really blustery night, the bake is just going to be less even — you turn more often and read the leopard pattern to compensate. Cold-climate baking doesn’t change the protocol; it just makes the stone temperature discipline matter even more.
Common Neapolitan Problems and Fixes
The four recurring Neapolitan failures are a soggy or raw center, no leoparding, a stuck launch, and a dense gummy crumb — and each maps to a specific, fixable cause. Most of them trace back to either stone temperature or dough handling, not the recipe.
A raw center usually means the base wasn’t thin enough or the stone was too cool to drive heat up through the dough fast. No leoparding means under-temp stone or too-slow a bake. A stuck launch means too much wet sauce sitting too long, or a peel without enough semolina. A gummy crumb means under-fermented or under-baked dough. Working through them systematically beats guessing — my Neapolitan troubleshooting guide is the full diagnostic flowchart for every common defect.
If your dough is the problem — tearing, slack, or sticky — that’s almost always a hydration or ferment issue, and the cold ferment method plus the hydration guide will get the base right before you ever touch the oven.
Putting the Whole Sequence Together
The full Neapolitan workflow is a chain where each link depends on the last: mix a 62% hydration 00-flour dough, cold ferment 48-72 hours, pull and warm the balls 2-3 hours ahead, hand-stretch with no pin, dress fast, launch decisively onto a 430-480°C stone, turn every 20-30 seconds, and pull at the first proper leopard. Roughly 60-90 seconds in the oven, 48 hours in the fridge before it.
If I were starting today with one piece of advice, it would be this: buy the IR thermometer before you buy a fancier oven. Knowing your real stone temperature solves more Neapolitan problems than any other single change, because nearly every failure — raw center, no leoparding, pale base — is a temperature problem wearing a costume. The oven is just the last 90 seconds of a 48-hour process; spend your attention where the process actually lives.
Frequently Asked Questions
What temperature do you need for Neapolitan pizza at home?
The stone surface should read 430-480 degrees Celsius before launch, measured with an IR thermometer at the stone center. Most standard home ovens top out at 250-300 degrees, so a dedicated high-temp oven or a pizza steel under a broiler is needed.
How long should Neapolitan pizza dough ferment?
A 48-72 hour cold ferment in the fridge gives the best flavor and digestibility. A 24-hour dough works but lacks the deeper wheat character. Always pull the dough balls 2-3 hours before baking so the gluten relaxes for stretching.
What hydration is best for Neapolitan pizza dough?
60-65 percent hydration works best for home Neapolitan, with 62 percent as a forgiving default. Higher hydration sticks to the peel and tears on launch, while this range gives an open crumb that still handles cleanly by hand.
Why does my Neapolitan pizza have no leoparding?
No leoparding almost always means the stone was too cool or the bake too slow. Leopard spots come from fast oven spring at 430 degrees plus. Check the stone with an IR gun and let it heat-soak fully before launching.
Can you make Neapolitan pizza in a regular home oven?
You can approximate it with a pizza steel preheated under a maxed broiler, giving a 3-5 minute bake rather than a true 60-90 second one. You will not get authentic leoparding without 430 degrees plus, but it is the honest test before buying a dedicated oven.
Should you use a rolling pin for Neapolitan dough?
Never. A rolling pin crushes the gas out of the rim and gives you a flat cracker instead of a puffed cornicione. Neapolitan dough is stretched entirely by hand, pressing gas from the center toward an untouched 1.5-2cm rim.
Related Guides
- How to Stretch Neapolitan Pizza Dough by Hand
- Neapolitan Pizza Launch Technique
- Neapolitan Pizza Oven Temperature Guide
- Neapolitan Pizza Leoparding Guide
- Neapolitan Pizza Fermentation Time
- Neapolitan Pizza Troubleshooting

About Kenny Nyhus Fadil
A home pizza maker documenting deck temps, dough logs, and the occasional wrecked launch.