Pizza Steel vs Stone: The Honest Home-Oven Verdict
Pizza steel vs stone for a home oven, tested same-dough on my 6mm steel and biscotto stone: thickness, preheat, the broiler trick, and what to actually buy.

Short version: in a home oven that tops out around 250–290°C, a 6mm steel beats a stone for most people, most of the time — because the bake is won or lost on how fast the surface dumps heat into a raw base in the first thirty seconds, and steel conducts heat several times faster than ceramic. But “steel wins” is the lazy headline. I’ve run the same dough across both surfaces on the same evening, over and over, and the honest answer is that the right choice depends on your oven’s ceiling, the style you’re chasing, and whether you’ll actually run the broiler. This guide is the one I keep publishing against the specialty ovens: before you spend money on an Ooni or a Gozney-class dome, your kitchen oven plus the right baking surface is the benchmark you should beat.
I bake in Sweden, where a proper outdoor pizza oven is a deliberate act of engineering rather than a backyard default, so the indoor home oven has never been a fallback for me — it’s the all-year reference. My kitchen setup is a 6mm steel and a biscotto-fitted electric for the high-heat work, but the steel-in-the-home-oven protocol is the one I test everything else against. Everything below comes out of that dough log: same batch, both surfaces, IR gun on the launch decision.
What steel and stone actually do differently
Both a steel and a stone are doing the same job: they store a big reservoir of heat during preheat and then release it into the bottom of your pizza the instant the dough touches down. The whole game of home-oven pizza is getting enough heat into the base fast enough to set the crust and drive oven spring before the top finishes — otherwise you get a pale, bread-like base and a soggy center. That’s the failure mode every home baker fights.
The difference between the two materials is thermal conductivity — how quickly the stored heat moves out of the slab and into the dough. Steel conducts heat far faster than ceramic or cordierite. When raw dough hits a hot steel, the contact is aggressive: heat floods the base, the bottom sets and chars quickly, and you get genuine oven spring even at home-oven temperatures. A stone holds plenty of heat too, but it releases it more gently. On a stone, the base browns more slowly and more evenly; on a steel, it browns faster and harder.
This single property cascades into everything else — preheat behavior, recovery time between bakes, how forgiving each surface is, and which pizza styles each one suits. I cover the heat-transfer side in depth in the preheat-time comparison, because preheat is where most people sabotage a stone without realizing it.
The verdict, oven ceiling by oven ceiling
Your oven’s maximum temperature changes the answer more than any other single factor. Here’s how I think about it after a few hundred home bakes on both surfaces.
If your oven tops out at 250–275°C (most ovens): get a steel. At these temperatures a stone simply can’t move heat into the base fast enough to compete with what the steel does. The steel’s aggressive conduction is exactly the cheat code you need to claw back the temperature your oven can’t reach. Pair it with the broiler and you’re in genuinely good Neapolitan-ish territory.
If your oven hits 300°C or a true pyrolytic self-clean lockout you can exploit: a stone becomes much more viable, and some people prefer the gentler, more even browning a stone gives at that heat. This is also the only realistic path to a softer, slower-browning crust if that’s the style you want.
If you bake a lot of bread too: a stone is the more versatile single purchase. Steel is phenomenal for pizza and great for crusty hearth loaves, but a stone’s gentler release is friendlier to enriched doughs and longer bakes where steel can scorch the bottom before the inside is done.
Steel vs stone: the head-to-head
This is the comparison I’d hand someone standing in a shop deciding. Numbers here are the ranges I see on my own bench, not manufacturer marketing.
| Factor | Pizza steel (6mm) | Pizza stone / cordierite |
|---|---|---|
| Heat into the base | Fast and aggressive — the home-oven cheat code | Gentle and even |
| Browning / char | Hard, fast, leopard-friendly | Slower, more even, harder to scorch |
| Best at low oven ceilings (250–275°C) | Excellent | Mediocre |
| Recovery between pizzas | Fast — conducts heat back to the surface quickly | Slower to recover the surface |
| Forgiveness for beginners | Less forgiving — can over-char if you forget it | More forgiving on timing |
| Bread versatility | Good, can scorch enriched doughs | Excellent all-rounder |
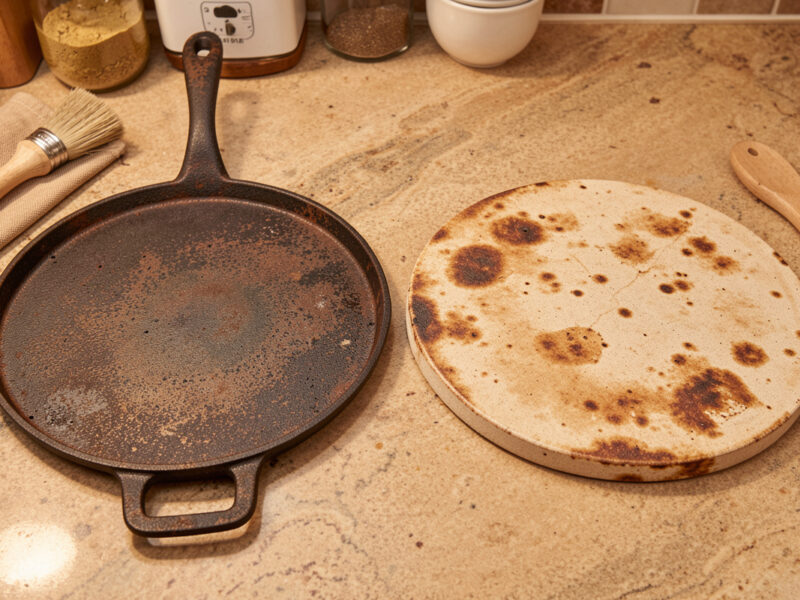
| Durability | Effectively indestructible; rusts if neglected | Cracks from thermal shock or moisture |
| Weight | Heavy (6mm steel is no joke) | Lighter but more fragile |
| Maintenance | Wipe, dry, light oil — like a cast pan | Dry-brush only, never soap, slow-dry |
If you only take one row from that table, take recovery time. The reason a steel feels so much better for back-to-back bakes is that it pulls heat from the oven body back up to the surface faster than a stone does. By your third pizza on a stone, the surface has cooled and the base goes pale; the steel keeps delivering. I dig into that in the preheat and recovery deep-dive.
Matching the surface to the pizza style you actually want
People argue steel-versus-stone as if there’s a single correct answer, but the right surface is partly a function of the crust you’re chasing. Here’s how I’d map it after baking the same dough toward different targets on both.
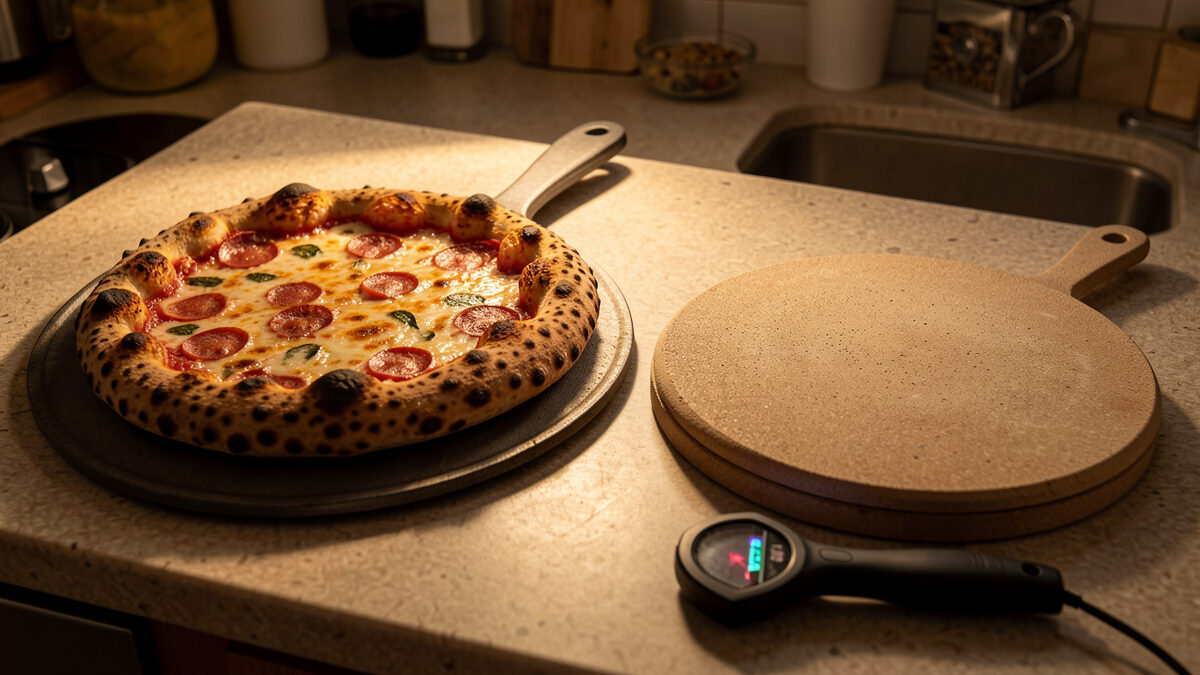
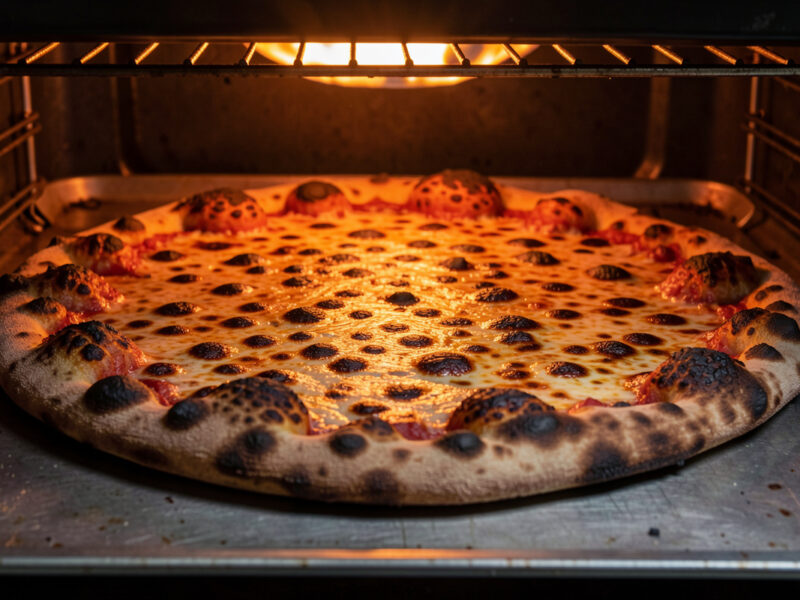
Neapolitan-leaning (puffy, charred, leoparded cornicione): steel, every time, in a home oven. This style lives or dies on fast, fierce base heat and a quick bake, and the steel plus broiler is the only home-oven combination that gets close. A stone at home-oven temperatures bakes this style too slowly and you lose the oven spring — the puff collapses into something flatter and more bread-like before the crust sets.
New York style (foldable, slightly chewier, more even browning): this is genuinely a toss-up, and one of the few cases where I’ll reach for a stone first. NY style wants a slightly longer, gentler bake than Neapolitan, and the stone’s more even heat release gives a more uniform bottom without the aggressive char points a steel produces. You can absolutely do NY style on a steel — just back off the broiler and watch the base — but the stone is forgiving here in a way that suits the style.
Pan styles (Detroit, Sicilian, grandma): the surface barely matters, because the pan is the surface. The steel or stone just acts as a heat reservoir to drive the pan from below. A steel’s faster conduction does give a crisper pan bottom, so if pan pizza is your main game, the steel has a slight edge there too.
So the honest summary is that the steel is the better default for the high-heat, fast-bake styles that benefit most from a home-oven upgrade, while the stone earns its place for gentler, more even bakes and for the bread crossover. If you’re undecided about which style you even want, that’s a dough question as much as a hardware one — start with the dough guide and let the crust you like dictate the surface.
The dough still comes first — here’s why it interacts with the surface
I’m a dough-first baker, and the reason that matters here isn’t dogma — it’s that hydration and ferment change how a dough behaves on a hot surface. A wetter dough (say 65–70% hydration) launches and bakes differently than a stiffer 58–60% dough, and a steel’s aggressive heat is more forgiving of a higher-hydration base because it sets the bottom fast before the moisture can make it stick or go gummy. On a cooler stone, a very wet dough is more likely to stick and steam rather than crisp. If you’re fighting a sticky launch and a gummy base, the surface might not be the problem — the dough’s hydration and your launch confidence usually are.
The other interaction is char tolerance. A long cold ferment builds the sugars that leopard-spot beautifully under fierce heat; an under-fermented same-day dough browns flat and dull no matter how hot your steel is. A perfect surface cannot rescue a dough that hasn’t developed. This is why I keep saying the steel is second in the hierarchy — it’s a multiplier on a good dough, not a substitute for one. The cold-ferment schedules that make the difference are in the dough guide.
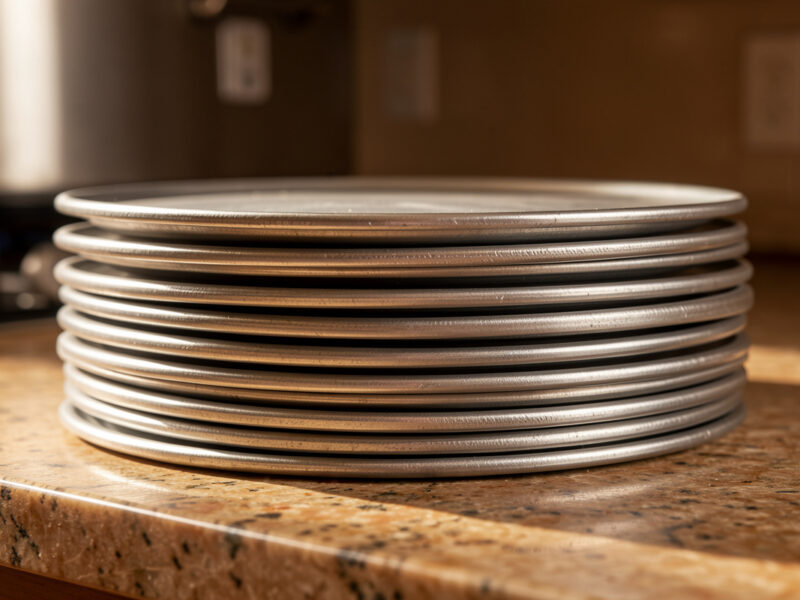
How thick does the steel need to be?
Thickness is the steel question everyone gets wrong in both directions. Thicker steel stores more heat and recovers faster between pizzas, but it also costs more, weighs a ton, and takes longer to preheat. Thinner steel preheats faster and costs less but runs out of stored heat sooner. For most home ovens, 6mm is the sweet spot — enough mass to deliver a proper first-pizza bake and recover for a second, without being an unliftable slab or needing a 90-minute preheat. I worked through the whole thickness trade-off, including why 10mm is usually overkill for a home cook, in the dedicated pizza steel thickness guide.
The short version: don’t buy thinner than 4mm (it dumps its heat and goes pale by the second pizza), and don’t reach past 6–8mm unless you’re regularly making four or more pizzas in a session. The extra mass is real, but so is the preheat penalty and the weight you’ll curse every time you wrestle it out to clean the oven.
The broiler method changes the whole equation
Here’s the technique that does more for home-oven pizza than any surface upgrade: use the broiler. A steel preheated near your oven’s max, then with the broiler fired up just before launch, gives you top heat that finally matches the fierce bottom heat the steel is already providing. That balance — aggressive base, aggressive top — is what closes most of the gap between a home oven and a dedicated pizza oven. Without it, the steel chars the bottom long before the top has any color, and you flip the whole problem.
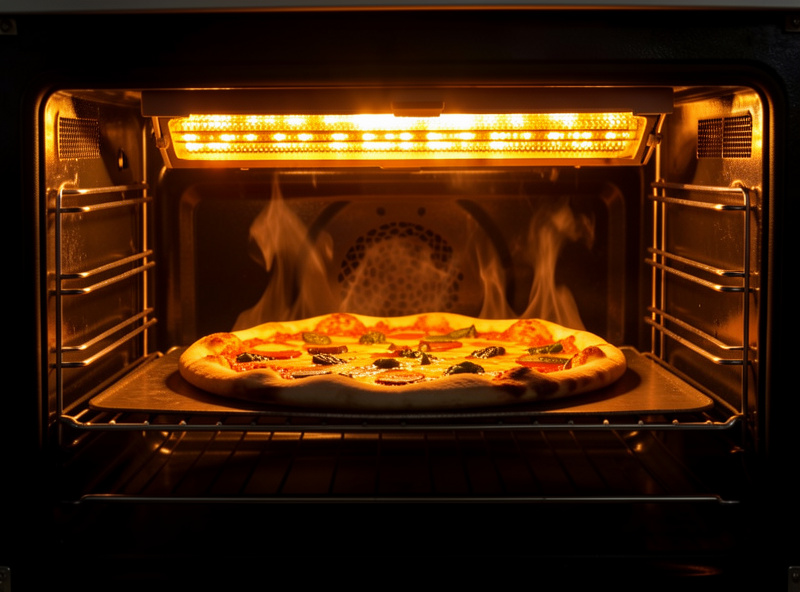
The trick is sequencing — preheat the steel long and hard on bake mode, then switch to broil for the last several minutes before launch so the steel surface and the broiler are both screaming. I wrote the full step-by-step, including the position to run the steel at and how to read when the top is done, in the broiler method walkthrough. A stone can use the broiler too, but it benefits less, because the base heat was the stone’s weak point in the first place — the broiler fixes the top, not the bottom.
Preheat: the step most people short-change
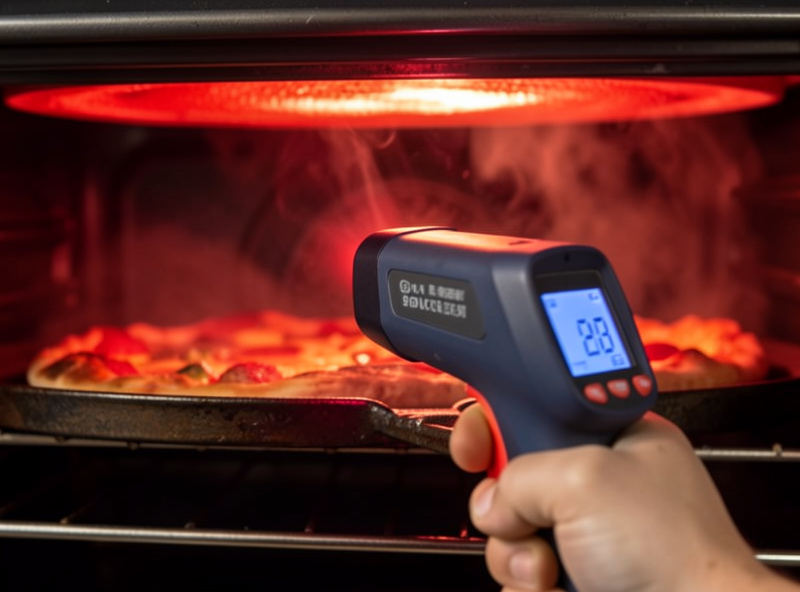
Whatever surface you buy, it is only as good as its preheat. The number one reason a stone disappoints is that people give it 20 minutes when it wants 45–60. The slab has to be fully heat-soaked — not just the surface, the whole mass — or the first pizza pulls the surface temperature down faster than the stone can recover, and you get a pale, sad base. Steel heat-soaks faster than ceramic but still wants a proper preheat, and the broiler trick assumes the steel is already fully loaded before you switch modes.
This is the single highest-leverage thing in home-oven pizza, and it costs nothing but patience and electricity. I check both surfaces with an IR gun before I commit a pizza, because the oven’s air thermostat lies to you — the slab is often 30–50°C off the air temperature. The full preheat timings for each surface, and the recovery-time reality between pizzas, live in the preheat-time guide.
What about the grill?
If your indoor oven is genuinely limiting and you’ve got a covered gas or kettle grill, putting a stone on the grill is a legitimate path to higher heat — a closed grill can run hotter than a kitchen oven and gives you that live-fire ambient heat from above. It’s not the same as a dedicated pizza oven, and there are real pitfalls (hot spots, thermal shock cracking a stone over open flame, getting the base done before the top burns), but it works. I prefer a stone over a steel on a grill specifically because the grill’s fierce, uneven bottom heat can over-char a steel base before the top is ready. I covered the setup, the cracking risk, and the two-zone trick in pizza on the grill with a stone.
Keeping your surface alive
A steel and a stone want opposite care, and getting it wrong is how people kill an expensive slab. Steel is basically a cast-iron pan: wipe it, dry it thoroughly so it doesn’t rust, and keep it lightly oiled. A stone is the fragile one — never wash it with soap (it’s porous and will drink it), never shock it cold-to-hot or wet-into-a-hot-oven (thermal shock is what cracks stones), and just dry-brush the char off. The full routine for both, plus what to do about a cracked stone and a rusty steel, is in the baking surface care guide.
Squeezing more heat out of a limited oven
If your oven’s ceiling is the real bottleneck — and for most home cooks it is — there are legitimate workarounds beyond the broiler to get more usable surface heat: running the self-clean cycle’s higher temperature carefully, exploiting the broiler’s radiant heat, positioning the surface higher in the oven, and managing the bake so the base and top finish together. None of these turn a kitchen oven into a 450°C deck, and some carry real cautions, but together they’re worth a meaningful jump in crust quality. I laid out the safe ones, the ones to skip, and the order to try them in the home oven max-temp workarounds.
The Nordic-cold reality check
One thing the indoor-versus-outdoor debate misses: in a cold climate, the home oven is the surface that’s always available. I bake outdoors at -5°C plenty, and I’ve learned exactly where an outdoor oven’s heat retention breaks in real cold — the recovery time between pizzas stretches out, the ambient temperature steals heat from the dome, and a windy launch can pull 50°C off your surface before the pizza even lands. The indoor steel-and-broiler setup has none of that volatility. It’s the same every time, January or July, which is exactly why it’s my year-round reference and the bake I judge every specialty oven against. If you live somewhere with real winters, weight that consistency heavily: the steel in your kitchen oven will out-bake a struggling outdoor oven on a cold, windy night nine times out of ten.
The mistakes that make people blame the surface
Before you conclude a steel or stone “doesn’t work,” check that you’re not committing one of the four mistakes I see constantly — none of which are the surface’s fault:
- Under-preheating. The big one. A stone given 20 minutes is a cold-cored stone. Give it 45–60, give a steel at least 45, and check with an IR gun, not the oven dial.
- Skipping the broiler. Running a steel on bake-only guarantees a charred bottom and a pale top. The broiler is not optional for balanced color.
- Blaming the hardware for the dough. An under-fermented, low-hydration dough will look mediocre on the best surface on earth. Fix the dough first.
- Wrong shelf position. A steel run too low chars the base; run it high (upper third) so it’s close to the broiler and the top and bottom finish together.
Get those four right and both surfaces perform close to their ceiling. Get them wrong and you’ll spend money on an outdoor oven trying to solve a preheat problem.
So which should you buy?
For the clear majority of home bakers — standard oven topping out at 250–275°C, chasing a crisp, charred, Neapolitan-leaning crust — buy a 6mm steel and learn the broiler method. It’s the highest-impact, most forgiving-of-a-weak-oven choice, and it’ll beat the daylights out of a stone in that environment. Get a stone instead if you bake as much bread as pizza, if your oven runs genuinely hot, or if you specifically want gentler, more even browning. And before you spend a krona on a dedicated outdoor oven, run this setup first — the honest truth is that a steel-and-broiler home bake is good enough that the specialty oven becomes a want, not a need.
Whatever surface you land on, remember the actual hierarchy of what makes a great pizza at home: the dough comes first, the surface and heat come second. A perfect steel won’t save an under-fermented dough. If you haven’t nailed the base yet, start with my complete pizza dough guide — a cold-fermented dough on a hot steel under a broiler is the whole home-oven game in one sentence.
Frequently asked questions
Is a pizza steel really better than a stone?
In a typical home oven that maxes out around 250-275C, yes – steel conducts heat into the base far faster than ceramic, so it sets the crust and drives oven spring before the top overcooks. A stone catches up only if your oven runs hot (300C+) or you specifically want gentler, more even browning.
How thick should a pizza steel be?
6mm is the home-oven sweet spot: enough mass to deliver a strong first bake and recover for a second without an unworkable preheat or weight. Avoid thinner than 4mm (it runs out of stored heat) and skip 10mm unless you make four or more pizzas per session.
Why does my pizza base come out pale on a stone?
Almost always under-preheating. A stone needs 45-60 minutes to fully heat-soak, not 20. Check the surface with an IR thermometer before launching – the oven’s air thermostat reads much higher than the cold-cored slab actually is.
Do I need the broiler for steel pizza?
Effectively, yes. The steel handles base heat aggressively, but without the broiler the top stays pale while the bottom chars. Firing the broiler for the last minutes before launch balances top and bottom heat and is the single biggest home-oven upgrade.
Can I bake bread on a pizza steel?
Yes, and it’s excellent for crusty hearth loaves. The caveat is that steel’s aggressive bottom heat can scorch enriched or longer-bake doughs before the inside is done – for those, a stone’s gentler release is the safer surface.
Will a pizza steel rust?
It can if neglected. Treat it like cast iron: wipe it clean, dry it thoroughly after any contact with moisture, and keep a light film of oil on it. A stone has the opposite weakness – it’s porous, so never use soap and never thermal-shock it cold-to-hot.
Related guides
- Pizza steel thickness: how thick is worth it?
- The broiler method for home-oven pizza
- Preheat time: steel vs stone
- Pizza on the grill with a stone
- Pizza stone and steel care
- Home oven max-temp workarounds
Related Guides — Complete Spoke List
Full spoke list of the Pizza Steel vs Stone cluster:
- “Home Oven Max Temp Workarounds for Better Pizza”
- “Pizza Stone and Steel Care: Cleaning
- “Pizza on the Grill With a Stone: What Actually Works”
- “Preheat Time: Steel vs Stone (and Why the Gap Matters)”
- “The Broiler Method: Real Neapolitan-ish Pizza in a Home Oven”
- “Pizza Steel Thickness: How Thick Is Worth It?”
More From This Site
Other guides across pizza steel vs stone and the rest of the Pizzatech library:
- “What Size Pizza Oven Should You Actually Buy?”
- “Used Pizza Oven Checklist: What to Inspect”
- “Pizza Oven for Cold Climate: The Nordic Reality”
- “Is an Indoor Electric Pizza Oven Worth It?”
- “Gas vs Wood Pizza Oven: The Honest Difference”
- “Ooni Koda 16 Review: A Long-Term Verdict”
- “How to Choose a Pizza Oven: The Complete Buying Guide”
- “Home Oven Max Temp Workarounds for Better Pizza”
- “Pizza Stone and Steel Care: Cleaning
- “Pizza on the Grill With a Stone: What Actually Works”
- “Preheat Time: Steel vs Stone (and Why the Gap Matters)”
- “The Broiler Method: Real Neapolitan-ish Pizza in a Home Oven”
- “Pizza Steel Thickness: How Thick Is Worth It?”
- “Same-Day vs Overnight Pizza Dough: Which to Make”
- “Pizza Dough Balls: Storage
- “Pizza Dough Too Sticky? Fix It Without Adding Flour”
- “Poolish Pizza Dough: The Preferment Method”
- “00 Flour vs Bread Flour for Pizza: What Actually Matters”
- “Cold Ferment Pizza Dough: The 48-Hour Method”
- “Pizza Dough Hydration Explained (and How to Pick Yours)”
- “How to Make Pizza Dough: The Complete Guide”

About Kenny Nyhus Fadil
A home pizza maker documenting deck temps, dough logs, and the occasional wrecked launch.
Keep Baking
Pizza Stone and Steel Care: Cleaning, Seasoning, and Cracks
The Broiler Method: Real Neapolitan-ish Pizza in a Home Oven